Dog Ear Cleaning Solution Homemade — Stop Itch & Odor Fast
A homemade dog ear cleaning solution can be safe and effective when done correctly.
Dog Ear Cleaning Solution Homemade — struggling with itchy, smelly ears? Learn safe DIY recipes, vet-friendly methods, and easy steps to clean your dog’s ears at home—without harsh chemicals or costly treatments. Discover what works and what could harm your dog.
If your Dog Keeps Scratching at their ears, shaking their head, or giving off an unpleasant ear odor, you are not dealing with an isolated problem. Ear discomfort is one of the most common issues dog owners notice, and it can start subtly before turning into something much more serious.
A small amount of wax, trapped moisture, seasonal allergies, or simple irritation can quickly change the internal environment of the ear canal. And because the canine ear is built differently from the human ear, problems can develop faster than many owners expect. What looks like “just a little dirt” may actually be the beginning of inflammation, yeast overgrowth, or a bacterial imbalance.
This is exactly why so many pet owners go searching for a homemade dog ear cleaning solution. The appeal is easy to understand: homemade options are affordable, accessible, and often use ingredients already found at home. But here is the catch: not every natural-looking remedy is safe, and not every DIY formula is appropriate for every dog.
Some internet recipes can worsen irritation, delay proper treatment, or even harm the delicate ear canal. That means the goal is not simply to clean ears. The real goal is to clean them safely, gently, and in a way that matches your dog’s specific needs.
Why Do Dogs Get Dirty, Smelly Ears?
In this guide, you will learn how to choose the best dog ear cleaning solution homemade for routine care, how to use ingredients correctly, what veterinarians generally caution against, and how to recognize the warning signs that mean home care is no longer enough. You will also get practical guidance for sensitive dogs, breed-specific care, and climate-related ear problems so you can make better decisions at home.
By the end, you will know when a homemade ear cleaner may be useful, when it is too risky, and how to clean your dog’s ears in a way that supports comfort, hygiene, and long-term ear health.
Why Dog Ear Cleaning Matters More Than Most Owners Realize
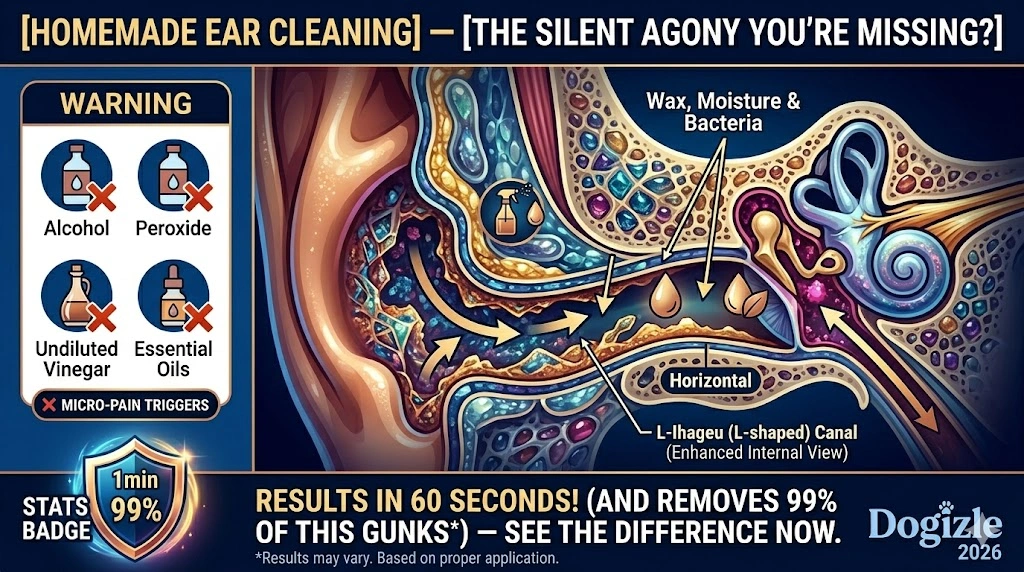
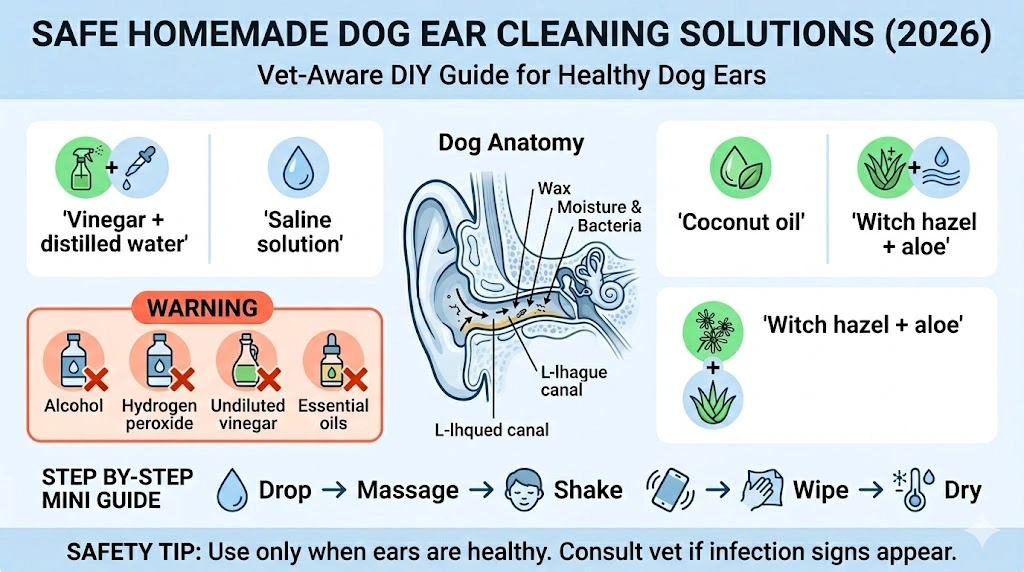
A Dog’s Ear is not shaped like a human ear. Instead of a short, mostly straight canal, dogs have a long, narrow, L-shaped ear canal. That design helps protect the ear from debris, but it also creates a hidden pocket where moisture, wax, and dirt can collect. Once material enters that canal, it does not always come out easily on its own.
This matters because the inside of the ear canal is warm, slightly enclosed, and often prone to reduced airflow. That combination can create an ideal environment for bacteria and yeast to multiply. If the ear stays damp after bathing, swimming, or wet weather, the risk increases even more.
Common signs of ear trouble include head shaking, repeated scratching, odor, redness, wax buildup, sensitivity when touched, and occasional tilting of the head. These are not just nuisance behaviors. They are communication signals. Your dog is telling you that something inside the ear feels wrong.
Certain dogs are also naturally more vulnerable. Floppy-eared breeds such as Cocker Spaniels, Basset Hounds, and Golden Retrievers often trap more moisture because the ear flap covers the canal. Water-loving dogs such as Labradors and Spaniels may have repeated wet ear exposure. Dogs with allergies can also experience recurring inflammation, which makes wax production and irritation more likely.
The point is simple: regular ear care is not about obsessive cleaning. It is about preventive care. A calm, gentle cleaning routine can reduce buildup, help you notice early changes, and lower the chances that a minor issue becomes a painful infection.
Is Homemade Dog Ear Cleaner Safe?
Yes, homemade dog ear cleaner can be safe in the right situation, but only when the formula is mild, properly diluted, and used for routine cleaning rather than active infection. That is the part many people miss. A “natural” ingredient is not automatically harmless, and a strong ingredient is not automatically effective.
Veterinary professionals generally agree on one principle: home cleaning can support maintenance, but it should never replace medical treatment when there are signs of infection, injury, or intense discomfort. If your dog has a painful ear, discharge, swelling, bleeding, a strong foul smell, or repeated flare-ups, DIY cleaning is not the right response.
The safest mindset is to treat homemade cleaners as maintenance tools, not miracle cures. They may help remove surface debris, reduce mild buildup, or make the outer ear more comfortable. They are not designed to diagnose the problem or solve every ear condition.
A safe homemade cleaner should do three things:
It should be gentle enough not to sting or dry out the ear.
It should be diluted enough to avoid irritation.
It should be used only when the ear looks otherwise healthy, and the dog shows no signs of serious pain.
If those three conditions are not met, stop and consult a veterinarian.
When You Should Not Use Homemade Ear Cleaners
There are moments when a homemade recipe is the wrong choice entirely. If your dog shows any of the following signs, home treatment should be avoided:
Pain when the ear is touched
Swelling or redness inside the ear
Yellow, green, brown, or bloody discharge
A strong, rotten, or yeasty smell
Repeated head shaking or tilting
Scratching that seems intense or urgent
A history of frequent ear infections
A visibly injured ear canal or broken skin
These symptoms can point to bacterial infection, yeast overgrowth, ear mites, a foreign body, or another issue that needs proper diagnosis. In those situations, cleaning alone may not help and can even make the ear more inflamed.
A useful rule of thumb is this: if the ear seems mildly dirty, routine care may be appropriate. If the ear seems painful, swollen, smelly, or abnormal, home care is too risky.
Best Homemade Dog Ear Cleaning Solutions Ranked by Use Case
The safest homemade option depends on what you are trying to address. One solution may be good for routine maintenance, while another may be more suitable for dry skin or very sensitive ears.
1. Vinegar and Distilled Water
This is one of the most commonly discussed homemade ear cleaning approaches for general maintenance. When diluted properly, white vinegar mixed with distilled water may help support a less favorable environment for some microbes and can assist with mild wax control.
A basic ratio is 1 part white vinegar to 1 part distilled water. The liquid should never be used undiluted, because full-Strength vinegar can sting and irritate delicate ear tissue.
This option is usually better for dogs with mild odor or general wax buildup, as long as the ear is not red, raw, or painful. It is not for dogs with open skin, obvious infection, or strong sensitivity.
2. Saline Solution
Saline is often considered the gentlest option because it is simple and non-irritating when prepared correctly. It is closest to body-compatible fluid and can be a good choice for sensitive dogs, puppies, and senior dogs.
Saline is not as powerful as a medicated cleanser, but that is exactly why many owners like it. It is mild, low-risk, and useful when the goal is simply to loosen debris and wipe away surface residue without introducing harsh ingredients.
This is often the safest homemade route for dogs with delicate ears or allergies.
3. Coconut Oil
Coconut oil is usually discussed more as a soothing, moisturizing option than a true ear cleaning solution. It may help soften dry skin and reduce the uncomfortable feeling of tight, flaky, or itchy ears. Some owners also like it because it has a smooth texture and can be applied in a very small amount.
That said, it is not ideal for every dog. If the ear already feels damp, congested, or infected, adding oil may trap material or make the ear harder to keep clean. It is best reserved for dry or mildly irritated ears, and only in small amounts.
4. Witch Hazel and Aloe Vera
This combination is sometimes used for its soothing feel, especially when the outer ear seems a little irritated. Witch hazel may help reduce the greasy sensation of buildup, while aloe vera is often valued for its calming texture.
However, this option should be approached carefully. Only pure, pet-safe, alcohol-free ingredients should ever be considered, and they should never be used inside an ear that looks infected or damaged. The formula should remain mild and conservative.
Comparison Table: Choosing the Right Homemade Solution
| Condition | Best Option | Typical Use | Safety Level |
| Mild wax buildup | Vinegar + distilled water | Occasional routine cleaning | Moderate |
| Sensitive ears | Saline solution | Gentle maintenance | Very high |
| Dry, flaky, itchy ears | Coconut oil | Small, occasional soothing | High |
| Mild outer-ear irritation | Mild witch hazel + aloe | Limited soothing use | High, with caution |
The most important point is not finding the “most powerful” cleaner. The real objective is matching the solution to the condition. That is what keeps the routine effective and reduces the chance of irritation.
Ingredients You Should Never Use
A lot of DIY advice online is written casually, but the ear canal is not the place for guesswork. Some ingredients that sound useful are actually harmful.
Alcohol
Alcohol can sting, dry the skin, and worsen inflammation. In a sensitive ear canal, that can mean more discomfort, not better hygiene.
Hydrogen Peroxide
Hydrogen peroxide is commonly mentioned in home remedies, but it can damage healthy tissue and cause excessive irritation inside the ear. It is not a good choice for routine canine ear cleaning.
Undiluted Vinegar
Vinegar only has a place in a highly diluted formula. Used full strength, it can be far too acidic for sensitive tissue and may cause burning or redness.
Essential Oils
Essential oils are widely promoted in wellness content, but many of them are not safe for dogs, especially when applied near mucous membranes or the ear canal. Some can be irritating, and some may pose toxicity risks.
Cotton Swabs Deep in the Ear
This is not an ingredient, but it is one of the most common mistakes. Pushing swabs or other objects deep into the canal can pack debris farther in, scratch the ear, or even damage the eardrum.
How to Clean Your Dog’s Ears Safely at Home
Safe ear cleaning is less about force and more about patience, gentleness, and technique. You do not need to scrub aggressively. You do not need to flood the ear. You only need to loosen surface debris and clean the accessible parts.
Step 1: Prepare the Solution
Use a mild, properly diluted solution and make sure it is at a comfortable temperature. Lukewarm is ideal. Very cold liquid can be uncomfortable, and hot liquid is obviously unsafe.
Step 2: Calm Your Dog
Pick a quiet place where your dog feels secure. Speak softly, keep your movements smooth, and have everything ready before you begin. A relaxed Dog is easier to clean and less likely to pull away.
Step 3: Lift the Ear Flap Gently
Hold the ear flap carefully so you can access the ear canal opening. There is no need to force the ear open or stretch it too far. You are simply creating room to apply the cleaner.
Step 4: Apply a Small Amount
Use only a few drops or the amount recommended for the selected solution. Overfilling the ear does not make it cleaner. It simply creates more liquid that your dog must shake out later.
Step 5: Massage the Base of the Ear
Massage gently at the base of the ear for about 20 to 30 seconds. This helps move the liquid through the accessible portion of the canal and loosen wax or debris. You may hear a soft squishing sound, which is normal.
Step 6: Let Your Dog Shake
Allow your dog to shake their head. This is part of the natural cleaning process and helps bring loosened material toward the outer ear.
Step 7: Wipe the Outer Ear
Use a soft cotton pad or clean piece of gauze to wipe away visible debris from the outer ear. Never insert anything deep into the canal. Focus only on what you can easily see and reach.
Step 8: Dry the Ear Area
Moisture is one of the biggest contributors to ear problems, so drying matters. Gently pat the visible area dry after cleaning, especially if your dog has floppy ears or tends to hold water in the ear flap.
Cleaning Frequency: How Often Is Enough?
More cleaning is not always better. In fact, cleaning too often can strip the ear of natural protection and create irritation. Most dogs do not need daily ear cleaning unless a veterinarian has specifically advised it.
For many healthy dogs, a weekly check is enough. Dogs that are prone to wax buildup, have floppy ears, swim often, or live in humid conditions may need more frequent inspection, but not necessarily more frequent full cleaning.
Think of ear care as a monitoring habit rather than a constant routine. Look, smell, and gently assess. If the ears appear healthy, leave them alone. If you see mild buildup, a gentle cleaning may help. If you notice redness or pain, stop and seek veterinary guidance.
Which Solution Is Right for Your Dog?
A simple way to decide is to match the ear issue to the cleaner.
If the ear smells mildly off and has visible wax but no pain, a diluted vinegar-and-water solution may be appropriate for some dogs.
If the ear is sensitive, easily irritated, or belongs to a puppy or older dog, saline is usually the safer choice.
If the ear is dry, flaky, or a little itchy, a small amount of coconut oil may be helpful for comfort.
If the outer ear looks mildly irritated but not infected, a very gentle soothing formula may be considered with caution.
This matching process matters because the wrong product can turn a small issue into a bigger one. The best homemade cleaner is not the same for every dog. It depends on the condition, the anatomy, the season, and the Dog’s sensitivity.
Signs Your Dog May Need Ear Cleaning
There are several signals that the ears may need attention:
Your dog shakes their head repeatedly
They scratch at their ears more than usual
The ear gives off an odor
You see wax or dirt near the outer canal
The ear looks slightly red or dirty
Your dog avoids ear contact or seems uncomfortable
These are early clues, not necessarily emergencies. The purpose of routine inspection is to catch the problem before it escalates. That said, if the problem becomes intense, painful, or persistent, medical care becomes the priority.
When to Avoid DIY and See a Vet
Home cleaning should stop immediately if the ear condition appears serious or if the symptoms are progressing instead of improving. You should see a vet when you notice:
Swelling
Discharge
Bleeding
Severe odor
Obvious pain
Frequent repeated infections
A head tilt that does not resolve
Loss of balance or unusual behavior
These symptoms can suggest an infection, mites, deeper inflammation, or another problem that cannot be fixed with surface cleaning alone. A veterinarian can examine the ear canal, identify the cause, and choose the proper treatment.
Climate Considerations for Ear Care
Climate can influence how often ear issues appear and what type of care makes sense.
Humid Regions
In humid places such as coastal areas or rainy climates, ears may stay damp longer. That increases the chance of moisture buildup and microbial growth. Dog Ear Cleaning Solution Homemade in these environments often benefits from careful drying after baths, rain, or swimming.
Cold and Dry Regions
In colder or drier climates, the challenge may shift toward dryness and irritation. Skin can become flaky, and over-cleaning can make things worse. Dogs in these areas may need gentler maintenance and less frequent intervention.
Warm Regions
In warmer climates, bacteria and yeast may thrive more easily, especially if the dog’s ears are covered, sweaty, or not dried properly after outdoor activity. Regular inspections become especially important.
The key takeaway is that the environment affects ear health. A dog living in a damp environment may need different care than a dog living in a dry one.
Breed-Specific Ear Care Considerations
Some breeds require more vigilance simply because of their ear shape, coat type, or activity level.
Floppy-Eared Dogs
Breeds with long, closed, or heavy ear flaps tend to trap warmth and moisture. These dogs often need more frequent inspection and careful drying after baths or outdoor play.
Small Indoor Dogs
Small dogs that live mostly indoors may have fewer environmental irritants, but they can still develop wax buildup or allergies. Their ears may need less frequent cleaning, but regular checking still matters.
Working or Outdoor Dogs
Dogs that spend more time outdoors are exposed to dirt, grass, dust, pollen, and water. They may need more frequent ear checks because their ears are exposed to more environmental debris.
Allergy-Prone Dogs
Dogs with allergies often experience recurring ear irritation. If your dog is constantly scratching or has frequent flare-ups, ear cleaning alone may not solve the underlying issue. Allergies may be the real trigger.
Common Mistakes Dog Owners Make
Even well-meaning owners can make ear care worse by doing too much or using the wrong technique.
Over-Cleaning
Cleaning too often can strip natural protection and make the ear canal more irritated. A healthy ear does not need constant intervention.
Using Cotton Swabs Deep Inside
This is one of the most common and risky mistakes. Deep insertion can push wax farther in or injure the ear canal.
Ignoring Early Warning Signs
Mild symptoms are often easier to manage than severe ones. Waiting too long can allow a small issue to become a painful infection.
Using Random Internet Recipes
Not every homemade formula is safe. Some recipes are designed for general cleaning, while others are simply not suitable for dogs at all.
Not Drying the Ears
Moisture left behind after washing or swimming can fuel irritation and infection. Drying is part of the cleaning process, not an optional extra.
Expert Tips for Safer Ear Cleaning
A few simple habits can make the process easier and more effective.
Dry the ears after baths, swims, or rainy walks.
Use separate cotton pads for each ear.
Keep your dog calm and reward cooperation.
Check the ears weekly, even when they seem fine.
Use mild solutions only when the ear is healthy.
Stop at the first sign of pain or worsening irritation.
These steps may seem small, but small habits often make the biggest difference in preventive pet care.
Pros and Cons of Homemade Dog Ear Cleaners
Pros
Affordable and easy to prepare
Uses ingredients that many households already have
Can be gentle when properly diluted
Useful for routine maintenance in healthy ears
Cons
Incorrect mixing can cause irritation
Not appropriate for infections or serious symptoms
Short shelf life compared with commercial products
Not every home recipe is truly safe for every dog
The balance is clear: homemade cleaners can be useful, but they are not universally appropriate. Caution is part of good pet care.
FAQ
No. Cleaning every day can irritate the ear canal and disrupt the ear’s natural protective balance. For Most Dogs, daily cleaning is unnecessary and may be counterproductive.
Yes—but only when diluted properly and only for the right dog and the right situation. Undiluted vinegar can sting and irritate sensitive tissue.
No. Hydrogen peroxide can damage healthy tissue and irritate the ear canal. It is not a good choice for routine dog ear care.
Usually, once a week or as needed, but the right frequency depends on the dog, the ear shape, the climate, and whether your Dog Ear Cleaning Solution Homemade is prone to wax buildup or moisture retention.
Yes, as long as they are safe and do not harm the animal. The key issue is not whether a solution is homemade, but whether it is gentle, properly diluted, and used responsibly.
Distilled water is safer because it reduces the chance of contamination. Tap water may be fine in some cases, but distilled water is the more conservative and hygienic option for DIY mixtures.
Conclusion:
The best Homemade Dog Ear cleaning solution is not about copying a random recipe from the internet. It is about making a smart choice based on your dog’s ear condition, sensitivity, and overall health.
For routine maintenance, a diluted vinegar-and-water solution may help some dogs with mild wax and odor. For sensitive or delicate ears, saline is usually the safest option. For dry, itchy ears, a tiny amount of coconut oil may provide comfort. And for mild outer-ear irritation, a very gentle soothing approach may be considered with caution.
But the most important lesson is this: homemade care is only appropriate when the ear is otherwise healthy. Pain, swelling, heavy discharge, foul odor, or repeated infections require